
Info Center
The Info Center provides you with information on working with SolFlex 3D printers.
Printer & Accessories
How do SolFlex 3D printers work?
SolFlex 3D printers make use of Digital Light Processing (DLP) which means that liquid light-sensitive photopolymers are converted into solid 3D objects through an UV light engine.
What is the life span of the LED light source?
According to the manufacturer, the life span of the LED light source is 30,000 operation hours.
Do I need a PC in order to execute a print job?
Basically, the printer is a stand-alone-device and the job file – which is needed to start a print job – can be brought to the printer via a USB stick or a network port. The job file has to be generated in a software program (such as Pyramis or Netfabb).
How often do I have to initiate the printer?
The printer has to be initialized prior to every print job as well as every time you turn on the printer.
How do I clean the printer?
The printer has to be cleaned with Isopropanol using a (paper) tissue.
Software
Software
What kind of CAM software should I use for generating the job files?
We are recommending to use Pyramis or Netfabb as a CAM software.
What are the system requirements for the CAM software?
| System requirements for Pyramis | |
| Operating System | Microsoft Windows 7 32/64 Bit
Microsoft Windows 10 64 Bit Note: older Windows platforms, as well as Linux or any OS by Apple is not supported. |
| CPU Type | Intel oder AMD (recommended: Intel I7) |
| Memory | 8 GB of RAM |
| Display Card | Nvidia GeForce GT/GTX Graphic Card (recommended: GTX 2GB) |
| Display Size | 21“ / 24“ |
| System requirements for Autodesk Netfabb 2018 | |
| Operating System | Microsoft Windows 10 64-bit
Microsoft Windows 8.1 64-bit Microsoft Windows 7 SP1 64-bit Note: 32-bit Windows, or older Windows platforms, as well as Linux or any OS by Apple is not supported. |
| CPU Type | Intel Core i5 (2.8+ Ghz) |
| Memory | 8 GB of RAM |
| Display Card | 2 GB dedicated video card with OpenGL 3.3 support |
| Display Resolution | 1280 x 1024 minimum |
| Network Card | Required for network installation with FlexLM licensing |
| Internet Connection | Optional depending on licensing, as well as for updates and A360 access. |
How do I place to objects perfectly?
If you do not use the whole building platform for your printed object(s), place the objects close to the edge of the platform since the peeling forces are lower in these areas than they are in the middle of the platform.
For smaller objects, please also mind the seaming line (= border of one build area). Printing within one build area saves printing times due to higher building speeds.
How do I place support structures?
When placing support structures, please follow these instructions:
> The parts of the printed object which are printed first, have to be connected to the building platform.
> The support structures have to be placed on the right positions. All overhanging parts with an angle of more than 45° to the building platform should be stabilized with support structures.
> There should be enough support structures to stand the peeling forces. The bigger the cross-sectional area of the object, the more support structures are needed.
> The connection between the support structures and the building platform should be enhanced by a base plate (hexagonal grid). The hexagonal grid should also cover the area surrounding the printed objects.
> The connection of the support structures to the printed objects should be stable enough to stand the peeling forces.
Software
Printing Process
How long does one print job take?
The duration of one print job depends on the type and size of the printed object.
The following illustration shows example prints:
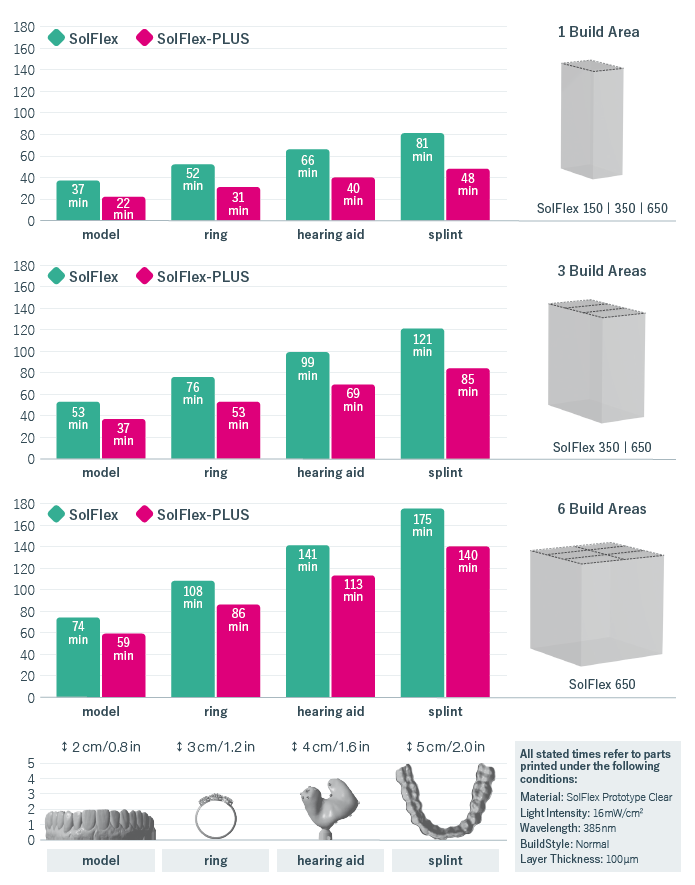
How do I know the estimated printing time?
The printer shows the estimated printing time. The estimation is based on the printing speed. Since the first 25-50 layers have lower building speeds, the estimation within the first 10 minutes seems very long. The actual printing time appears afterwards.
Is it possible to refill material during the printing process?
Yes, it is possible to refill material during a print job. Please pause the print, open the plastic cap and pour the material into the vat using a funnel.
How do I remove the printed parts from the building platform?
After the printing process, the printed parts can be levered off the building platform by means of a sharp object such as a spatula or tweezers.
Please note that the parts have to be handled with care to avoid damaging them.
Why are print jobs non-printable?
There are two very common reasons for non-printable print jobs:
1) The printer had not been initialized
2) The models were not well-prepared for printing in Netfabb / Pyramis and consequently, the first layers are missing or the grid is placed above the building platform. Thus, please double-check the first picture of the job files in Netfabb and make sure that there is a connection between the building platform and grid or the object you would like to print, respectively.
Why do objects dissolve themselves from the building platform?
To secure safe printing, you can use a wide-meshed grid and also, put a frame around the grind, leading to guarantee a more gentle separation of the printed parts from the building platform.
The printed parts should also be placed closed to the edges of the building platform and – if possible – not across the seaming line (= border of one build area).
Another reason why an object might dissolve from the building platform could be a big cross-sectional area. A way to reduce the cross-sectional area, move the parts to a more vertical position.
Software
Material
What kind of material do I need for my SolFlex 3D printer?
3D printing by Digital Light Processing requires liquid resins (photopolymers).
The SolFlex 3D printers are open material systems which means that materials of various manufacturers can be used. Please note that the material you use works for devices within the UV spectrum (385 nm), as offered by VOCO, Detax or Dreve.
In case you would like to use materials which are not to be found in the material library of the SolFlex printer, please contact a support engineer first.
What should I consider prior to the use of the material?
Please read the instructions on the bottle as well as on the safety sheet carefully and follow all instructions. We also recommend you to shake the material bottle well (5 minutes) before using it. Model materials have to be shaken even more thoroughly, since they tend to be more sensitive to sedimentations.
Do I have to stir the material in between two print jobs?
Yes, the material has to be stirred in between two print jobs, using a soft object, such as a silicon scraper. Otherwise, particles could settle on the ground.
How should I store materials?
Please keep the material in total darkness in order to avoid changes in color of the printed objects (yellowing).
How many objects can I print out of 1,000 g material?
Out of 1,000 g material, approx. 10% will be used for support structures, leaving 900 g for the actually printed parts. Please note that there are no exact rules for the use of support structures and therefore sometimes it might takes more than 10% of the used material to print them. Moreover, the amount of material depends on the kind of material and its viscosity.
The following examples are rough values to provide an orientation for the amounts of objects that can be printed with 1,000 g material.
Models (á 25g): 36 pcs.
Splints (á 7g): 128 pcs.
Ear moulds (á 4g): 225 pcs.
Rings (á 1g): 900 pcs.
Pyramis and Netfabb give you the exact building volume of an object. Based on the building volume, the material use can be calculated.
How much material fits in the vat?
There are four different types of vats with different maximum capacities:
PowerVat for SolFlex 650: 500 ml material
FlexVat for SolFlex 650: 220 ml material
FlexVat for SolFlex 350: 150 ml material
FlexVat for SolFlex 150/170: 210 ml material
The mark on the vat shows the maximum filling level and helps you to not overfill the vat.
The minimum amount of material that should be put in the vat depends on the material use for the printed object. It is recommended to use double of the required amount.
What kind of material does W2P recommend?
The SolFlex 3D printers are open systems and can process resins of various manufacturers. Please find the full list of SolFlex resins here.
Do I have to remove the residual material from the vat after the printing process?
Yes, the material should be removed from the vat and kept in a safe, closed container in a dark environment.
In case the resin is being used for another print job, the resin can be stored in the vat for a short period of time.
Software
Post Processing
How do I have to post process the printed objects?
After having removed the printed objects from the building platform, the following post processing actions have to be taken:
1) Cleaning
2) Removing support structures
3) Post-curing (if necessary; not all materials need to be post-cured)
Please wear appropriate safety equipment during the post processing phase, including a laboratory coat, safety goggles as well as single-use gloves.
How do I clean the printed objects?
The objects have to be cleaned twice. First, clean the objects directly after levering them off the building platform. Also, clean the objects a second time after having removed the support structures.
Cleaning instructions:
1) Place the printed parts in a container filled with Isopropanol.
2) The container has to be cleaned in an ultrasonic bath as long as stated in the safety sheet of the material.
3) The residual material has to be removed through air compression.
How do I remove support structures?
Support structures should be removed carefully by using scissors. In case there are sharp ends, grind them in order to provide a smooth surface quality.
How do I post-cure the printed objects?
As recommended by most material manufacturers, the printed objects should be dried before post-curing them. For best results, please use the flash device recommended for the used material. Otherwise there might be changes in color of the material. The printed parts should be post-cured for the indicated time.
Can the parts be steam sterilized at 134°C?
The material properties can be found in the safety sheets of the material manufacturer. VOCO and Detax, for example, provide materials that can be steam sterilized.
How long does the post-curing process in the flash-curing device take (e.g. Otoflash G171 / NK Optik)?
The post-curing time depends on the material and ranges from 3 to 10 minutes.
Leading material manufacturers recommend the following post-curing times:
SolFlex Med Clear: 2,000 flashes with the Otoflash (2,000 flashes take approx. 3 minutes)
SolFlex model materials, e.g. SolFlex Model Grey: 2 x 3,000 flashes (6,000 flashes take approx. 10 minutes)
Which kind of gas can be used for the flash-curing device (Otoflash G171)?
Typically, the flash-curing device Otoflash G171 is flooded with nitrogen.
Can broke flash bulbs of the flash-curing device be replaced?
Yes, there are spare bulb modules available for the flash-curing device Otoflash G171.
Can the flash-curing device (Otoflash G171 / NK Optik) be used to post-cure other materials too?
Basically, the flash-curing device can also be used for other materials, but there might be changes in color or impairment of the biocompatibility of the material.
Need further help? Please feel free to contact us any time.
Our professional customer support team will be happy to help.